Introducing Charged

Today, I am excited to be introducing Charged. Charged is a new iOS app for drivers of electric vehicles (EV's) around the world, helping them find available chargers.

With Charged, you can find EV chargers, check their availability in real-time, and be notified once availability is found.

What can Charged do?

Along with finding chargers, Charged can help you view real-time availability with up-to-date information for many charging sites globally. Perhaps my favourite feature is that, when there's no availability found for a charging site, Charged can monitor availability for you. It uses Live Activities to keep you informed of availability at a particular charger right from your lockscreen, and can also send a Push Notification once a charger becomes available. No more waiting around wondering, or constantly having to check an app to know when a charger is available!

Importantly, Charged is a global app. With information on almost 2 million EV charging sites worldwide - 800,000 of which provide real-time data - it's very likely to have you covered whether you're driving around your local area or planning an interstate trip in your EV. If you're wondering whether it has data for your region - the answer is probably. I'd encourage you to download and see for yourself.

Why Charged?

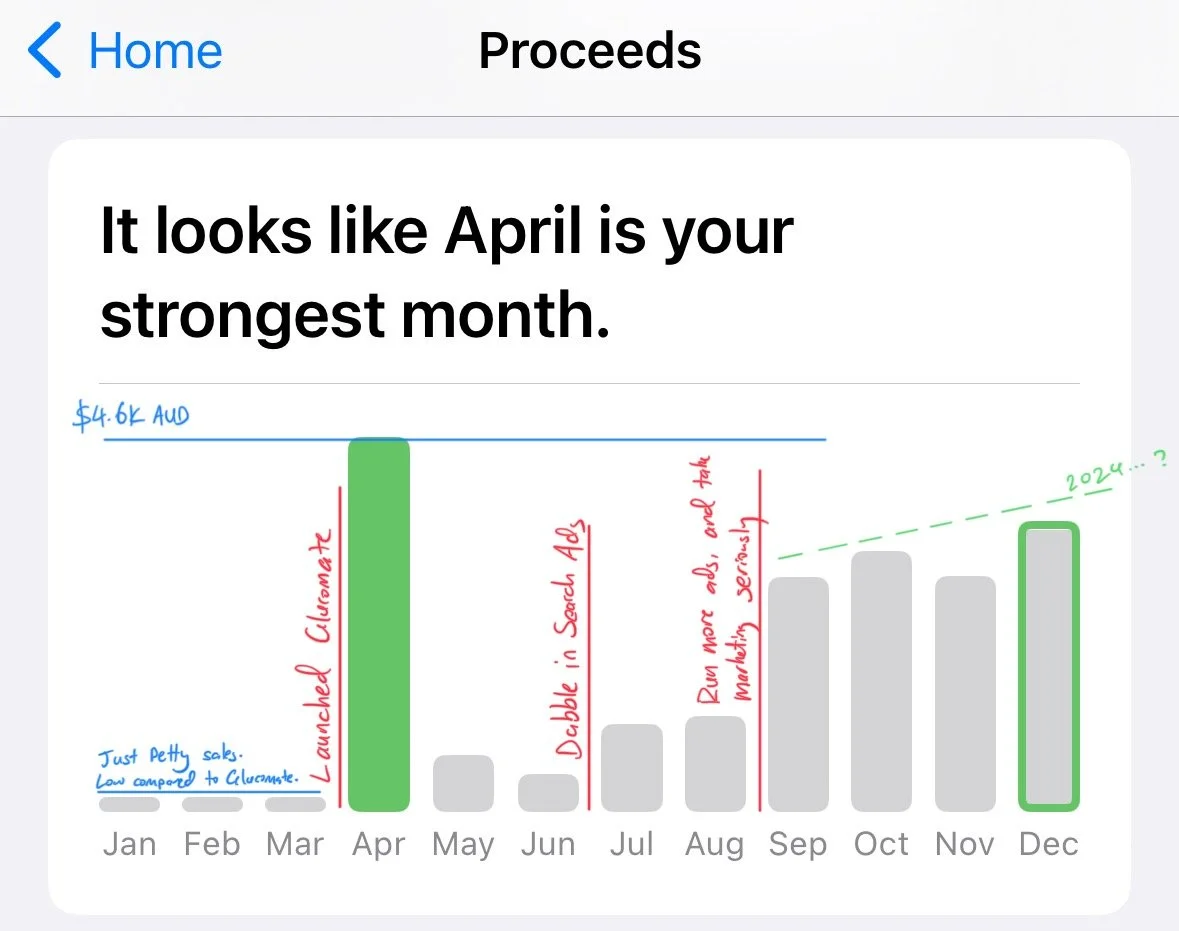
For years, I've worked on an app called Petty which helps Australian drivers find cheap fuel and save when they fill up. Some of the data sets used by Petty have added some brands of EV charging sites but with very few details about the site, and the data is far from comprehensive. Meaning that Petty was helpful to EV drives in only select situations.

Petty is known for being a modern-looking app that's nice to use, that feels at home on iOS with features like a Watch app, Siri Shortcuts, and CarPlay support. A few years ago I started getting suggestions from people to build something like Petty but for EV charging sites. After hiring an EV for the first time and taking it for an incredibly enjoyable drive through Tasmania, I realised that I could build something good here, and started taking the idea more seriously.

Petty has always been an app that you want to use and my goal is for Charged to be exactly the same.

The Future

It was important for Charged to not just be "yet another" EV charge finder map, and that's where the availability monitors come into it. This is a feature unique to Charged which really improves the overall experience when you're might be waiting around for a charge.

But of course, being a 1.0, there is still a lot to do. One glaring omission for an app like this is route planning. Another is a CarPlay app. These, and more, are on the roadmap. They'll take time, and didn't make the cut for 1.0, but my hope is that Charged has enough of a point of difference for the 1.0 to be compelling as-is.

Which features to prioritise next will depend on what people want to see - so please do get in touch via the app and let me know. It might even be something I haven't thought of yet.

Membership

Specific prices are available on a pricing page on the website, or by checking the App Store for prices in your region, but the gist of it is that Charged is a paid app and a membership/subscription is required to use it. Some features also have usage limits. This is simply due to the cost of the quality data Charged uses being high enough that we can't sustainably offer a free tier or unlimited usage.

All plans offer a one week free trial to start, so you can get a feel for whether Charged suits your needs before you need to pay.

I know not everyone will need all the features - especially the costlier features like availability checking and monitors - so membership is split into three tiers, each with different feature limits and access:

  1. Slow Charge: Find charging stations on a map with details like plug types and charger speeds. Filter results and get directions to nearby chargers.
  2. Fast Charge: All the features of Slow Charge, plus real-time charger availability at supported sites.
  3. Super Charge: All the features of Fast Charge with higher usage limits, plus charger availability alerts with Live Activities and Push Notifications.

All membership tiers offer weekly, monthly, and yearly plans allowing you to subscribe for only as long as you need access. Weekend getaway? The weekly plan will do. Longer road trip? How about monthly. Constantly using public charging? Yearly will suit.

I'm open to feedback on the pricing structure, so get in touch if you have thoughts.

Stay in the Loop

Maybe this sounds interesting, but you're not ready to use Charged today. I'd encourage you to the Charged mailing list where I'll be sending updates about the app and details about new features as they roll out.

Wrapping Up

You can download Charged from the App Store by following this link. I'd encourage you to check out the app, take advantage of the free trial, and set up an availability monitor at a charging site near you.

This is just the beginning for Charged, and I'm excited to be putting v1.0 out into the world today. Please feel free to get in touch with thoughts and feedback. The best way to contact me is through the Contact button on the Charged website.


Links

App Store: https://apps.apple.com/us/app/charged/id6578435971

Website: https://chargedup.app/

Press: https://chargedup.app/press

Responding to selection of a MapKit pin in SwiftUI

We're about 5 years past the introduction of SwiftUI and it's impressive how far the framework has come in this time. However a part of SwiftUI that has been noticeably inferior than its UIKit counterpart is anything to do with MapKit UI.

MapKit, particularly when used with UIKit components, is a very detailed and well thought-out piece of kit, but that's only really true when used in a UIKit context. It powers a lot of what you see in my app Petty. As such, I have tried to keep a close eye on its development alongside SwiftUI. An essential part of almost any map-heavy application is the ability to be shown more information upon selection of a pin or point on the map. This could be by pushing to a detail view, being presented with a sheet/overlay, or something else entirely.

It escaped my attention at the time, but as of the iOS 17 updates introduced at WWDC 2023, it is possible to do this with SwiftUI's new Map.init<SelectedValue: Hashable>(selection: Binding<SelectedValue?>) initialiser. The code is dead simple, too. For this example, let's show a few pins on a map, and when one is selected, present a sheet displaying the name of the location.

We start with a model to represent the data:

struct StationDetails: Identifiable, Hashable {
    
    struct Position: Hashable {
        let lat: Double
        let lon: Double
        
        var coordinate: CLLocationCoordinate2D {
            CLLocationCoordinate2D(latitude: lat, longitude: lon)
        }
    }
    
    let id: String
    
    let name: String
    let position: Position
}

And now let's plug it into a Map:

struct ContentView: View {
    
    @State private var selection: StationDetails? = nil
    
    let stations: [StationDetails]
    
    var body: some View {
        Map(selection: $selection) {
            ForEach(stations) { station in
                Marker(station.name, coordinate: station.position.coordinate)
                    .tag(station)
            }
        }
        .sheet(item: $selection) { station in
            NavigationStack {
                Text(station.name)
            }
            .presentationDetents([.medium])
        }
    }
}

And that's it. Really! This code is fully-functioning. I haven't seen any good posts about this Map(selection:) initialiser – so here one is. I hope it's helpful. Now of course we could make this nicer by doing things like moving the map position so that the pin appears centred when the sheet appears – but that functionality is beyond the scope of this post.

Since binding to selections is now possible, we're close to the point where I would no longer default to laying out a map with UIKit. The last thing keeping me in MapKit-UIKit-by-default land is lack of support for pin clustering. One can hope for WWDC25, right?

Armed with this knowledge, go forth and react to map pin selection changes.


Here's the full code from the above example, putting everything together including imports and a SwiftUI preview:

import MapKit
import SwiftUI

struct StationDetails: Identifiable, Hashable {
    
    struct Position: Hashable {
        let lat: Double
        let lon: Double
        
        var coordinate: CLLocationCoordinate2D {
            CLLocationCoordinate2D(latitude: lat, longitude: lon)
        }
    }
    
    let id: String
    
    let name: String
    let position: Position
}

struct ContentView: View {
    
    @State private var selection: StationDetails? = nil
    
    let stations: [StationDetails]
    
    var body: some View {
        Map(selection: $selection) {
            ForEach(stations) { station in
                Marker(station.name, coordinate: station.position.coordinate)
                    .tag(station)
            }
        }
        .sheet(item: $selection) { station in
            NavigationStack {
                Text(station.name)
            }
            .presentationDetents([.medium])
        }
    }
}

#Preview {
    ContentView(stations: [
        StationDetails(id: UUID().uuidString, name: "Sydney", position: StationDetails.Position(lat: -33.8688, lon: 151.2093)),
        StationDetails(id: UUID().uuidString, name: "Melbourne", position: StationDetails.Position(lat: -37.8136, lon: 144.9631)),
        StationDetails(id: UUID().uuidString, name: "Perth", position: StationDetails.Position(lat: -31.9514, lon: 115.8617))
    ])
}

Petty 7.1: Tomorrow's Prices for WA & CarPlay Map Improvements

It can be difficult to know where to focus your attention as an independent software developer. There are always more ideas and more features to build than you have time for, and being able to prioritise effectively is a skill unto itself. A skill I'm not very good at, but nonetheless.

It was only a month ago that I introduced a CarPlay app to Petty. The initial response was better than I expected, and people seem to really like this feature. It probably doesn't hurt that it's a unique feature amongst fuel price apps in Australia.

One of the bits of feedback from the CarPlay launch that surprised me was the sheer number of requests to add tomorrow's pricing for WA. For those unfamiliar, one state specifically – Western Australia (WA) – makes prices for the next day available from about 2:30pm local time. This is valuable information for motorists and yet another way to help save money. I get requests to add this feature to Petty from time to time, but have always kicked the can down the road as it isn't a frequent request, and the last time I looked there weren't many users from WA. After launching the CarPlay app, I probably got more requests for it in a week than I've had in total until that point. That was enough to get my attention.

After looking at the stats which say that just over 12% of Petty users are in WA – about in line with WA's overall percentage of the Australian population – it seemed like it was finally time to add this feature. In the process of building it, I became increasingly more excited about it. I can see the value in being able to know that you aren't about to fill up only for prices to drop by 20c per litre the next day, or conversely that you should wait until tomorrow because you don't need fuel today and you'll save a few bucks tomorrow. After seeing how helpful it is, I'm surprised that people in WA use Petty at all before it had this information!

It's an interesting task to take an app centred around the concept of a single price for a given fuel type at a given station at any given moment. If you're in a state without tomorrow's prices, or in WA at a time before tomorrow's prices are available, nothing will be different. You'll still see today's prices in exactly the same location. What has changed is that once tomorrow's prices are available, you'll see them. In your favourites list, in the station list, in the station detail, and on the map. You'll even see them around the CarPlay interface. Currently tomorrow's prices don't factor into the trends and real-time average price analysis, and I think that's fine. A "Should you fill up" feature has also been added, indicating at-a-glance if today's prices are more expensive, cheaper, or the same as tomorrow's for your preferred fuel type.

Pricing in the other states doesn't work the same way as in WA. Stations elsewhere can change their price at any time with no mandated warning (as far as I know), and I don't see that changing anytime soon. After seeing how cool it is to be able to view prices ahead of time in WA, I'm hopeful it comes to more states around Australia, but I'm not holding my breath. However, if it does, all the systems are in place and tomorrow's pricing could easily be plugged into Petty for a different state.

The 7.1 update to Petty also improves the CarPlay map to show real-time prices for chosen petrol types, instead of just showing station logos as was the case previously. Should they be available, it will show tomorrow's prices as well. This makes it look more like the map on your iPhone. You can also share a link directly to a station from the app (e.g. https://petty-app.com/stations/1) and it will open in Petty if the app's installed. If it isn't, a webpage with the current prices at that station will open. This makes Petty more useful in more places – beyond just the iOS app.

I hope you like the update – especially if you're in WA. If you have questions, or notice any issues with this feature please get in touch via the app, and I'll do my best to get back to you quickly.

Petty 7.0: Introducing CarPlay

Today I'm excited to announce the release of v7.0 of Petty with brings a major new feature to the app: support for Apple CarPlay.

Petty is an iOS app I've built and maintained for over 6 years, and features real-time petrol pricing and trends for various states around Australia. At the time of writing all states and territories except for Victoria and the Northern Territory are supported. Petty helps you find stations nearby, and to keep on top of prices at your favourite regular stations. You can see where we are in the price trend cycle, to help make an informed choice about if it's a good time to fill up.

One of the more common requests I get for Petty is for adding CarPlay support. It makes sense to want to check fuel prices in the place you probably think about them the most – in your car. For a while it wasn't possible, but fortunately as of iOS 16, Apple introduced more allowed app types including "Fuelling".

There were no issues being granted an entitlement to build to support CarPlay, and over the last few months build it is exactly what I've done. Without going into too much detail, I immensely enjoyed the development experience. It's quite different from building an iOS or watchOS app. CarPlay apps must choose from standard UI templates, with only certain templates being available for different types of apps. Put differently, there are guardrails in place, you must stick to certain UI styles and types, and you can't place whatever content you want at any arbitrary point on screen into a CarPlay app. It makes sense as there are safety considerations when designing an app designed to be used by someone behind the wheel (while parked and stationary, of course). The limitations mostly don't affect Petty as it's an app with lists of content, and places marked out on a map – both of which are templates supported by CarPlay. The way filters are edited and applied in CarPlay is a bit awkward, but that's about the only compromise I had to make, and hopefully it isn't UI you interact with very often.

Overall, I'm pleased with how it turned out. If you're familiar with Petty, its CarPlay support offers all the features you'd expect:

  1. View prices at your favourite stations
  2. Add/remove favourites
  3. Get directions
  4. See nearby stations in a list and on a map
  5. Filter stations by fuel type, state, etc.
  6. View current average prices.

If you use and like Petty, I'm almost certain you'll love using it in your car. As far as I know, Petty is the only app with Australian fuel prices to offer a CarPlay app. It is truly a very nice experience. CarPlay is considered a premium feature of Petty, and as such an active subscription is required to use it.

If you have any feedback or suggestions, feel free to get in touch via the Petty iOS app – I'm happy to chat. Thank you to all the beta testers who provided early feedback and helped me work out what the most important features are when using Petty in your car.

You can download Petty on the App Store.

The State of My Software Business: January 2024

For many years now, I have run a small software business. I'm the only employee. Most of what the company does is contract work for wonderful clients, and I've had the privilege of working on projects and teams that I thought I'd only ever get to admire from afar.

The company has also built and sold software products through the App Store, which is becoming an increasingly larger percentage of overall revenue, and is what I want to discuss in this post. The main product prior to 2023 was Petty which is an app for Australian motorists to help them find nearby petrol stations and real-time prices. Petty has always been a passion project, and still is. It makes some money, but the few hundred dollars a month it makes doesn't move the needle for my business. Regardless, I enjoy working on it, will continue to do so, have learnt a tonne in the process, and it's the perfect app to experiment with cool new iOS features such as widgets, shortcuts, and an Apple Watch app.

Enter Glucomate

In my spare time over the last few years, I'd been working on an app to help people make sense of their blood glucose data. It comes from a personal need, as I have a continuous glucose monitor which records my sugar every 5 minutes and sends these readings to HealthKit on my iPhone, but it can be difficult analyse these readings later on.

After polishing it intensely for almost a year, Glucomate launched in April of 2023. The launch went better than I could've imagined, and I was incredibly fortunate to have kind words written about it on the launch day by many, including on popular Apple sites such as Daring Fireball and 9to5Mac. This kicked off immediate interest in the app, and meant Glucomate hit the ground running with a decent user base that has continued to help me know where to take the app thanks to lots of feedback and suggestions.

Growth potential

Only a few months after launch, it was clear that Glucomate had potential, but only if I was willing to put in the time to build what people want.

Most of the features I've prioritised building until now are a direct result of feedback. Knowing what people find difficult, or things they want to be able to do, is incredibly helpful. Building things that people suggest over and over gives me the confidence that I'm not wasting time building it, as the demand is clearly there.

It wouldn't grow without me putting in the work – both on the app itself but also on getting it out there. Spreading the word. "Marketing", if you will…

Part-time indie

I've always wanted to spend more time building and shipping my own software. Knowing that Glucomate had potential, but needed more time and effort put in, around September last year I set out to grow it and started by significantly reducing the amount of contract work I took on. While I also have more time to spend on Petty, and I have some great things planned, it's clear from the sales numbers that Glucomate is my best chance of improving revenue from my indie apps.

App Store revenue by month in 2023. Screenshot from the excellent Trendly app.

The above chart shows sales numbers for 2023 broken down by month. You can see an April was the best month for revenue, as it was the launch month for Glucomate. In April, revenue reached AU$4.6K (after Apple’s 15% and after GST [tax applied to sales in Australia]).

Has spending more time on my own projects worked so far? I think so. Looking at the above chart you can see clear growth from the moment I started spending more of my week working on them, which was late August/early September. Admittedly most of the growth is from Glucomate, and I'm spending somewhere around AU$1K per month in marketing to get there, but growth is growth.

Growing the app

The part that has surprised me most about spending more and more time on Glucomate is how building new features and improving the app is only half the story. The other is a focus on marketing. All of which is new to me, and consists of trying things out and seeing what sticks.

So, what has and hasn't worked?

App Store Search Ads. These have worked. I seem to have capped out what I can spend on search ads, at least with the most relevant keywords, but I continue to see a good return from them. Though I do appear to have come close to capping out what they can do. i.e. It's now at a point where throwing more money at the Search Ads budget doesn't result in the ad being shown more, as I guess there is only a certain number of people searching for this kind of app in a given day.

Instagram is also been something I'm experimenting with. I'm not totally sure it's worked, but I don't think it's been a total waste of time and money either. I realised that there's a huge type 1 diabetes community on Instagram, and with that in mind I set up an account for Glucomate. Apparently it also legitimises an app or website amongst the youth to have an active presence on Instagram. I'm trying to post regularly, and not exclusively about Glucomate, to keep it interesting for a wider group of people interested in diabetes content. Some paid posts seem to have done a good job in driving people to the website, though it's hard to know exactly how many downloads this has resulted in. Even if Instagram ads are break even or run at a slight loss I'm willing to continue running them as part of a broader marketing strategy. I plan to continue regularly posting (hopefully relevant!) things to Instagram throughout the next year, in attempt to continue growing this account.

Glucomate also just launched a partnership with the great organisation the DANII Foundation. You may know them as the charity responsible for lobbying for the heavy subsidy of continuous glucose monitors (CGM's) for all Australians with type 1 diabetes. Truly great work. Glucomate is providing a subscription free for 3 months to all their audience. It helps their mission of helping people with diabetes, while also helping to get Glucomate in front of more people. Hopefully a genuine win-win, though of course I won't know if this helps Glucomate subscriptions for another 3 months.

Something that didn't work was discounting the yearly subscription to Glucomate by a full 50% during the Thanksgiving/Black Friday/Cyber Monday week. I did see slightly more people pick yearly than monthly during the sale, but there just wasn't enough of a boost on new subscribers compared to a regular week to justify the discount and "make it up in volume." I suppose it makes sense – there just wouldn't be much overlap between people looking through indie app sales lists and people who'd find Glucomate useful. I'd absolutely run a sale again (in fact, I'm running a Christmas/New Year sale right now), but the discount would be far more modest than 50%.

Things to try

I tend to think of growing an app has happening in stages. First you launch and go from zero to (hopefully) non-zero revenue. Then maybe you get some press attention which leads to growth which then settles down at a new normal. Then maybe ads have a similar effect. At least this is what I am finding with Glucomate.

So how can I work on getting new and different attention on Glucomate? My first thought was to try and get covered by websites/blogs that do lists of apps that are helpful to people with diabetes. Some of these sites write reviews as well. I reached out to dozens, and followed up, and the responses can be categorised into a few categories.

  1. No reply. The most common.
  2. "We'll take a look" followed by nothing
  3. "Sure, our rates are $XYZ to write about your thing. The last one in particular surprised me. Since I have no idea what to expect in terms of a return, this seems risky. I'm also not sure how I feel about supporting sites that claim to have a "best of" list that you can pay to be featured on when this isn't clearly disclosed.

I mentioned earlier that Instagram is popular place for people with diabetes to share things. And where there is an audience there are, of course, influencers. It's a bit out of my depth, but I'd like to try some paid promotion for Glucomate that way. I'm not sure what to expect, but it would be yet another way to get the app directly in front of its target audience.

Other than that, I'll continue with Search Ads as these are having great success, and of course continue building new features based on user feedback. A major feature I hope to build and release this year is integration with more HealthKit data types, as it's a common request from people to want to see how other data points (such as weight and blood pressure) correlate with their blood glucose.

Summary

So there's my 2023 business retrospective. It was certainly an interesting year. If you'd told me this time last year that I'd be able to justify time during the week to working on my own stuff, and exactly how much revenue has grown over the last year, I'd be over the moon. However in the moment it's easy to take this for granted and look forward to the next milestone. My own apps clearly don't make enough for me to live off of exclusively yet (Sydney mortgage and all), but things are definitely trending in the right direction and I couldn't be happier with that. Most importantly, I'm excited about my work again. Building Glucomate is something I enjoy immensely, because I find the app itself so useful. The challenge of trying to grow the business is also enjoyable, and it's satisfying every time a change to the app or a new marketing strategy pays off. It's also not too disappointing when something doesn't work, as I've generally still learnt something by trying.

Would I work exclusively on my own things if I could? I'm not sure, but it would be nice to have the option. I'll continue working towards it in 2024.

Introducing Glucomate

I'm thrilled to introduce you to Glucomate.

That feels good to write. It's been a long time coming.

For over 20 years, I've had to monitor my blood glucose every single day. The way in which I monitor it has changed a bit over the years, but the need to stay on top of the readings hasn't.

During that time, I've heard various things about a cure for type 1 diabetes. Funnily enough, it's always 5-10 years away. I won't get my hopes up, but what I do know is that over the last couple of decades, despite there not being a cure, the technology available to treat and manage the disease has improved dramatically. First came the insulin pump. Not having to take multiple needles a day is certainly appealing. I tried one of the early ones, but it didn't work well for me. Things were worse than when I was on needles, and led to my poor parents being very stressed. So they decided to go back to needles. Fair call. I should add that they were fantastic at managing my diabetes, and I only realised later how hard their job must've been. Fast forward the better part of a decade and I decided to give a pump another try. Things had advanced significantly, and it worked well for me. I'd gained some extra control over my blood sugar - especially useful during the turbulent teenage years. Happy days.

Not much changed for a while after that, until late 2017 when I decided that it was worth trying a continuous glucose monitor since I was eligible for a government subsidy on what was otherwise very expensive medical equipment. I wrote a lot about the experience - from being skeptical to deciding CGM was something I couldn't live without! Having real-time access to my glucose was transformative. Having real-time information can be stressful (information overload at its best), but the control it gives - especially when combined with an insulin pump - can't be beaten. My results improved dramatically, and to this day remain better than any time I was either on needles or just an insulin pump without CGM.

A CGM generates a lot of data, and the one I use even writes that data to HealthKit (though admittedly with a 3-hour delay). Real-time information is only available via the manufacturers app, unless you're willing to jump through many hoops. No matter, there's still a huge amount of data being collected. And it starts to build up. But surely all of this data is good for something. What can we do with it?

That's where Glucomate comes in. It's an app for people who record, track, and monitor their blood glucose and use HealthKit to do it. Glucomate is the app that finally does something with all that data. You can analyse recent readings, spot trends, or go back to any date and view its history. It does all this while trying to look as good as possible. A notable feature is the ability to customise each of the tabs by reordering the displayed data. You can even choose to hide the data that isn't relevant to you.

Glucomate is great for quick data entry - be it on your iPhone or Apple Watch. You're always only a few taps away from adding your latest glucose reading. If you don't record it manually, that's fine too. As long as your readings are written to HealthKit, it will be picked up in Glucomate. Further integrations with HealthKit mean you can view glucose during workouts or even during sleep sessions. Being able to view this data back is extremely helpful when trying to identify trends in your levels, and is useful when trying to make decisions to manage things even better.

But not everyone has a bunch of glucose data in HealthKit. Most people wouldn't. Glucomate has a full-featured Demo Mode which allows anyone to get a feel for the app by using it with sample data. This is an incredibly useful tool for helping you decide if Glucomate could be valuable for you - without having to give it data to begin with.

This is just the start. I have a long list of features and improvements that I hope to get to in good time. This first version of Glucomate gives the kind of stats and insights that I've always found most valuable when trying to manage my diabetes. I hope other people who record their glucose will find it equally as valuable. I'm sure that there are also types of graphs and stats that people prefer and that I haven't thought of. I'm excited to hear what other people would find useful, and work to add that into the app.

With that in mind, I'd love if you checked it out on the App Store. Give it a go. Play around. Put in your glucose readings, or try demo mode. And be sure to let me know what you think.


App Store: https://apps.apple.com/app/apple-store/id1574243765

Website: https://glucomate.app

Press kit: https://glucomate.app/presskit


Please feel free to get in touch with thoughts and feedback. A way to contact me is available on the Glucomate website.

Multiple Preference Keys on the Same View in SwiftUI

The problem

Cast your mind back to the early days of SwiftUI. It wasn't possible to have multiple .sheet modifiers attached to the same View. Or, for that matter, to the same "tree" of the view hierarchy. Apple has since fixed this, at least for Sheet, so code like this is now perfectly valid:

Text("Hello, world")
    .sheet(isPresented: $presentSheetOne) {
        Text("Sheet one")
    }
    .sheet(isPresented: $presentSheetTwo) {
        Text("Sheet two")
    }

But, what if you try this with an Alert?

Text("Hello, world")
    .alert(isPresented: $showAlertOne) {
        Alert(title: Text("Alert one"))
    }
    .alert(isPresented: $showAlertTwo) {
        Alert(title: Text("Alert two"))
    }

At the time of writing (June 2022) the above code will not work. The second alert will present fine, if you want it to. But setting showAlertOne to true will not result in the first alert being presented.

What is going on?

It is safe to assume that behind the scenes, Apple is using preference keys to drive these APIs, and there are limitations associated with preference keys. It's well documented elsewhere, but problems arise when either multiple views in the same view try to set the same preference key, or when multiple views in the same branch of the view hierarchy tree try to set a preference key - e.g. both a parent and child trying to set the same preference key. The problems remain when trying to respond to a custom preference key.

The example

Imagine an app that wants its deeply-nested child views to bubble information up to the parent using preference keys. This post assumes a basic understanding of preference keys in SwiftUI. We'll use a simple example, with strings from a couple of text fields being set up the view hierarchy. Each text field has an associated priority value, and messages with a higher priority should be shown before those with a lower priority. Take the following code.

struct Message: Equatable {
    enum Priority: Int, Equatable, Comparable {
        case low, medium, high

        static func < (lhs: Message.Priority, rhs: Message.Priority) -> Bool {
            lhs.rawValue < rhs.rawValue
        }
    }

    let priority: Priority
    let content: String
}

struct MessagePreferenceKey: PreferenceKey {
    static var defaultValue: Message?

    static func reduce(value: inout Message?, nextValue: () -> Message?) {
        guard let existingValue = value, !existingValue.content.isEmpty else {
            value = nextValue()
            return
        }
        guard let next = nextValue(), !next.content.isEmpty, next.priority > existingValue.priority else {
            return
        }
        value = next
    }
}

extension View {
    func message(_ message: String, priority: Message.Priority, isShown: Bool) -> some View {
        preference(key: MessagePreferenceKey.self, value: isShown ? Message(priority: priority, content: message) : nil)
    }
}


struct ContentView: View {

    @State private var message: Message? = MessagePreferenceKey.defaultValue

    @State private var textOne: String = ""
    @State private var textTwo: String = ""

    @State private var showMessages: Bool = false

    var body: some View {
        VStack {

            if let message = message?.content {
                VStack {
                    Text("Message!!!")
                        .font(.title3)
                    Text(message)
                        .fontWeight(.semibold)
                }
                .padding()
                .background(Color.gray)
            }

            VStack {
                TextField("Message one", text: $textOne)
                    .message(textOne, priority: .high, isShown: showMessages)
                TextField("Message two", text: $textTwo)
                    .message(textTwo, priority: .medium, isShown: showMessages)
                Toggle("Show messages?", isOn: $showMessages)
            }
        }
        .onPreferenceChange(MessagePreferenceKey.self) { newMessage in
            self.message = newMessage
        }
    }
}

Multiple views are using preference keys to send a message up the chain. If both text fields try to present their data, only the text entered in the first text field will be shown, due to its higher priority. If the first text field is empty, anything in the second text field will be shown. If both are empty, nothing is shown.

But what if we want to apply two of the .message modifiers to the same view? Let's say we want all the modifiers on the parent view:

VStack {
    TextField("Message one", text: $textOne)
    TextField("Message two", text: $textTwo)
    Toggle("Show messages?", isOn: $showMessages)
}
.message(textOne, priority: .high, isShown: showMessages)
.message(textTwo, priority: .medium, isShown: showMessages)

This is a similar situation to having two alerts attached to the same view from earlier. Despite our best efforts, doing this will never show the text from the first text field - despite it having the highest priority. The second .message modifier always takes priority.

This issue can also be seen when the modifier is applied to two views in the same "tree":

VStack {
    VStack {
        TextField("Message one", text: $textOne)
            .message(textOne, priority: .high, isShown: showMessages)
        TextField("Message two", text: $textTwo)
    }
    .message(textTwo, priority: .medium, isShown: showMessages)
    Toggle("Show messages?", isOn: $showMessages)
}

In an example project this isn't a big deal, as we can move views and their modifiers around to ensure no conflicts. In a larger project where views upon views are nested, and it's impossible to have a complete picture of the view hierarchy, we run into this problem all the time. It can be daunting to set a new preference key higher up the chain for fear of unknowingly affecting one in a subview below.

The solution

So, what can be done? The secret lies in where the preference key is set on the view hierarchy.

extension View {
    func message(_ message: String, priority: Message.Priority, isShown: Bool) -> some View {
        preference(key: MessagePreferenceKey.self, value: isShown ? Message(priority: priority, content: message) : nil)
    }
}

Applying the preference key to a hidden rectangle behind our view changes the hierarchy enough that we are able to put multiple preference keys on the same view, or along the same branch of the view tree.

background(Rectangle().hidden().preference(key: MessagePreferenceKey.self, value: isShown ? Message(priority: priority, content: message) : nil))

With this change, the following code is now completely valid:

VStack {
    VStack {
        TextField("Message one", text: $textOne)
        TextField("Message two", text: $textTwo)
    }
    .message(textOne, priority: .high, isShown: showMessages)
    .message(textTwo, priority: .medium, isShown: showMessages)
    Toggle("Show messages?", isOn: $showMessages)
}

The first message, if present, is shown with priority. Otherwise, the second will be shown.

It works as expected. We've done it!

Tying it all together

How does this relate to our initial example with Alert? We can apply what we've learnt about preference keys to the Alert modifier, and explore how to apply multiple .alert modifiers to the same view.

Extending View, and giving our modifier the same background + rectangle treatment gets us here:

extension View {
    func multipleAlert(isPresented: Binding<Bool>, content: () -> Alert) -> some View {
        background(Rectangle().hidden().alert(isPresented: isPresented, content: content))
    }
}

Which allows multiple alerts to be attached to the same view, like so:

Text("Hello, world")
    .multipleAlert(isPresented: $showAlertOne) {
        Alert(title: Text("Alert one"))
    }
    .multipleAlert(isPresented: $showAlertTwo) {
        Alert(title: Text("Alert two"))
    }

Of course, there are many modifiers that can be used to apply alerts to a view, and we'd have to override all of the ones relevant to our project. But this is a good start.

In conclusion

Preference keys are powerful, and knowing how to use them is important for any SwiftUI developer. Apple has deemed this issue with having multiple preference keys attached to the same view big enough issue to fix it for Sheets in SwiftUI, but for some reason the original behaviour remains for Alerts and other types of preference-key backed views. There may be a good reason why. It may be a misuse of the API to allow multiple preference key values to complete all from the same branch of the view hierarchy. I don't know. But I do know sometimes you have a need to set preference key values from multiple, nearby places in your view hierarchy, and the discussed solution allows that to be achieved. You'll find this solution most useful when working with your own preference keys in SwiftUI.

I hope this won't be necessary in a future release of SwiftUI, or at least it will be explained why this solution is a bad idea, and how to properly achieve what we're trying to achieve here with preference keys. But until then, this is the best approach I've found.

As always if you have any feedback, or just want to say hi, I can be contacted on Twitter.


For reference, here is the full code to the sample project in its final state.

struct Message: Equatable {
    enum Priority: Int, Equatable, Comparable {
        case low, medium, high

        static func < (lhs: Message.Priority, rhs: Message.Priority) -> Bool {
            lhs.rawValue < rhs.rawValue
        }
    }

    let priority: Priority
    let content: String
}

struct MessagePreferenceKey: PreferenceKey {
    static var defaultValue: Message?

    static func reduce(value: inout Message?, nextValue: () -> Message?) {
        guard let existingValue = value, !existingValue.content.isEmpty else {
            value = nextValue()
            return
        }
        guard let next = nextValue(), !next.content.isEmpty, next.priority > existingValue.priority else {
            return
        }
        value = next
    }
}

extension View {
    func message(_ message: String, priority: Message.Priority, isShown: Bool) -> some View {
        background(Rectangle().hidden().preference(key: MessagePreferenceKey.self, value: isShown ? Message(priority: priority, content: message) : nil))
    }
}


struct ContentView: View {

    @State private var message: Message? = MessagePreferenceKey.defaultValue

    @State private var textOne: String = ""
    @State private var textTwo: String = ""

    @State private var showMessages: Bool = false

    var body: some View {
        VStack {

            if let message = message?.content {
                VStack {
                    Text("Message!!!")
                        .font(.title3)
                    Text(message)
                        .fontWeight(.semibold)
                }
                .padding()
                .background(Color.gray)
            }


            VStack {
                VStack {
                    TextField("Message one", text: $textOne)
                    TextField("Message two", text: $textTwo)
                }
                .message(textOne, priority: .high, isShown: showMessages)
                .message(textTwo, priority: .medium, isShown: showMessages)
                Toggle("Show messages?", isOn: $showMessages)
            }
        }
        .onPreferenceChange(MessagePreferenceKey.self) { newMessage in
            self.message = newMessage
        }
    }
}

Introducing Petty 4.0

I'm thrilled to today release v4.0 of Petty to the App Store. Petty is an app made for NSW motorists, designed to help them stay up to date with real-time petrol prices, average prices, and trends.

Petty has been on the App Store for over three years now, but this is its biggest update yet. A lot of work has gone into this release, with some features being a work-in-progress for the better part of a year. Work has really ramped up in the last few months, to get it ready for a launch that coincides with the release of iOS 14. Also a massive thanks to J who helped with the design work for the new Dashboard tab.

So, what's new? Lots!

  • Real-time average prices - view the current average price of E10, U91, P95, and P98 petrol.
  • Price trends and history - view price trends for up to 30 days.
  • Favourites - mark stations as favourite for convenient access.
  • Dashboard tab - Now the primary tab of the app. It's the place to view current average prices, trends/history, and access your favourites.
  • Compare - compare prices between stations, or even to the current average prices across NSW.
  • Map - now shows more stations at a time.
  • Widgets (iOS 14 only) - View average prices and price trends on your homescreen. Or choose to show the current real-time prices at a particular station. The choice is yours.
  • Subscriptions - added a yearly subscription, with a 7-day free trial.

It's a big one, and there's still plenty more to come.

You can check it out and download for free on the App Store. A taste of all features is included without subscribing. Features such as (but not limited to) trends, compare, and favourites are available in a limited capacity without an active subscription.

Fitting with recent goals and themes of the apps, there's no third-party code, no analytics, and no tracking. If you like the app, you pay for premium features. We don't make money in other ways.

Hope you like the update. If you've got any feature suggestions, questions, or complaints, feel free to get in touch - I'd love to hear from you! Twitter is the best place to do that, otherwise the contact form on this website is fine.

PettyMarketingImage.png

SwiftUI Map

Note this post is current as at the time of writing - 4th August 2020 - and at such time Xcode 12 beta 3 (12A8169g) is the most recent available version of Xcode.

At WWDC20, as part of a bunch of new SwiftUI UI elements, we got Map. It's a super limited Map API that should only be used for the simplest of Maps. UIKit's MKMapView is still the real-deal for the time being. Hopefully this changes soon.

Anyway, all that Map is good for is showing a few simple markers or pins at key points on a map.

How do we do this?

Well, don't forgot to import MapKit! This one got me... yes, I can be slow at the best of times. If you're used to working in SwiftUI, typically import SwiftUI takes care of all the relevant UI elements. But not if you want to display a Map!

Now that you've managed the simple stuff, here's some more simple stuff.

If you just want to show a map, the bare minimum you can get away with is initialising a Map with a coordinateRegion (a good ol' MKCoordinateRegion). If you've worked with maps in UIKit you'll be familiar with this.

Some example code:

struct ContentView: View {
    private static let defaultCoordinate = CLLocationCoordinate2D(latitude: -33.8688, longitude: 151.2093)
    private static let defaultSpan = MKCoordinateSpan(latitudeDelta: 20, longitudeDelta: 20)
    @State private var coordinateRegion = MKCoordinateRegion(center: defaultCoordinate, span: defaultSpan)

    var body: some View {
        Map(coordinateRegion: $coordinateRegion)
    }
}

Now what about showing things on this map? Markers or pins, anyone? The Map API is very simple - it takes a RandomAccessCollection (a Swift Array is fine) with data, and allows you to turn it into a map pin. This could be your data model. I've constructed a very simple one below for convenience. The only requirement is that it conforms to Identifiable.

struct Location: Identifiable {
    let id = UUID()

    let name: String
    let coordinate: CLLocationCoordinate2D
}

We're going to pass an array of Location objects through to the Map initialiser, and use them to construct pins on the map. For example, let's mark out cities on the East Coast of Australia.

First, add some data:

private let locationsToDisplay: [Location] = [
    Location(name: "Sydney 😎", coordinate: CLLocationCoordinate2D(latitude: -33.8688, longitude: 151.2093)),
    Location(name: "Melbourne 😷", coordinate: CLLocationCoordinate2D(latitude: -37.8136, longitude: 144.9631)),
    Location(name: "Brisbane 🤪", coordinate: CLLocationCoordinate2D(latitude: -27.4698, longitude: 153.0251))
]

Then, change the map to use a different initialiser:

Map(coordinateRegion: $coordinateRegion, annotationItems: locationsToDisplay) { location in
    /* Initialise and return a pin here */
}

The above won't compile. Inside of the closure body is where we construct and return a pin. A pin is something that conforms to the MapAnnotationProtocol which, at the time of writing, is restricted to either a MapMarker or MapPin. Again, this is all very limiting. Use MapKit if sophistication is what you're after.

Okay so let's return a marker:

Map(coordinateRegion: $coordinateRegion, annotationItems: locationsToDisplay) { location -> MapMarker in
    let marker = MapMarker(coordinate: location.coordinate)
    return marker
}

This will display a standard map marker that you might be used to seeing on an iOS map. Note the very limited customisation available - you give it a coordinate and can optionally set the tint colour - that's it. No way to mark it with a title, as far as I can tell, and there's especially no way to handle it being interacted with. Very limited practical use-cases here, but that's how you do it if you're interested. To display a MapPin (old school!), it's very much the same as above just swap out MapMarker for MapPin. Similarly, the pins can't be given a title, subtitle, or really any metadata you'd expect to be able to give a pin, so they're only good for displaying things at a high level and not if you want anyone to be able to interact with the pin itself.

The purpose of this post was to demonstrate how to show a marker or pin on a Map with SwiftUI. It's extremely limiting for now, hopefully the API's are improved with time.

Because we all like code that can be copied/pasted and played around with, here's a full working SwiftUI view you can use that demonstrates everything mentioned in the article above.

import MapKit
import SwiftUI

struct Location: Identifiable {
    let id = UUID()

    let name: String
    let coordinate: CLLocationCoordinate2D
}

struct ContentView: View {
    private static let defaultCoordinate = CLLocationCoordinate2D(latitude: -33.8688, longitude: 151.2093)
    private static let defaultSpan = MKCoordinateSpan(latitudeDelta: 20, longitudeDelta: 20)
    @State private var coordinateRegion = MKCoordinateRegion(center: defaultCoordinate, span: defaultSpan)

    private let locationsToDisplay: [Location] = [
        Location(name: "Sydney 😎", coordinate: CLLocationCoordinate2D(latitude: -33.8688, longitude: 151.2093)),
        Location(name: "Melbourne 😷", coordinate: CLLocationCoordinate2D(latitude: -37.8136, longitude: 144.9631)),
        Location(name: "Brisbane 🤪", coordinate: CLLocationCoordinate2D(latitude: -27.4698, longitude: 153.0251))
    ]

    var body: some View {
        Map(coordinateRegion: $coordinateRegion, annotationItems: locationsToDisplay) { location -> MapPin in
            let marker = MapPin(coordinate: location.coordinate)
            return marker
        }
    }
}

struct ContentView_Previews: PreviewProvider {
    static var previews: some View {
        ContentView()
    }
}

Petty 3.1

Petty v3.1 is now live on the App Store.

I'm excited about this release for two reasons:

  1. The app now finally looks presentable. The UI isn't embarrassingly out of date, it supports light and dark mode, and it looks a lot more presentable on the App Store.
  2. This is the first version of Petty that points to my own custom API, instead of directly hitting the API of the data provider. This gives more control over what can be done with the data, and will enable some cool upcoming features. It's also the first time I've shipped anything that runs on a server, so it'll be an interesting learning experience. So far, three days in, nothing's caught fire and so hopefully that's a good sign.

I've got lots of new features planned for Petty, so I'm very excited about this release which is "paving the way..."