
I'm in the process of building out a Mac app for one of my iOS side projects - Petty - using the new "Catalyst" tools announced by Apple at WWDC this year. Petty has become my iOS development playground, as I use it to experiment with new iOS technologies. This was the case with Siri Shortcuts last year. My motivation for finishing work on the Mac app for Petty is that I'll be presenting a talk, Updating Your App for iOS 13 at the /dev/world/2019 conference in Melbourne, and part of that talk will cover bringing the iOS app to macOS.
The menu bar is one of the most iconic parts of a Mac GUI. It's consistent, helpful, and rather intuitive. It helps people uncover actions, and abilities of an app, and also provides a little more for power users - keyboard shortcuts for these actions. Naturally, most Mac apps feel more "at home" on the Mac if they take advantage of system features such as the menu bar. Admittedly, Petty is a simple app with few hidden features. That said, I'd still like to customise the menu bar when Petty is run on the Mac.
This post will be about customising the menus in the menu bar programatically, with Swift. It is also possible to achieve this using Storyboards as demonstrated in the WWDC19 session video, Introducing iPad Apps for Mac. There's a live demo towards the end of that session video if you're interested.
Let's build and run Petty on the Mac.

Menu bar after building and running with no customisation.
By default, this is what the menu bar looks like when Petty is first built run on the Mac. Without customisation, there's an application, file, edit, format, view, window, and help menu.
To help customise the menu bar there's a new method in the AppDelegate which can be overridden, buildMenuWithBuilder. The first step is to override this, and call super.
override func buildMenu(with builder: UIMenuBuilder) {
    super.buildMenu(with: builder)
    /* Do something */
}
The first objective is to remove the menus that aren't wanted. There is text input in Petty (in the form of a search field), so the "Edit" menu should stay. There's no need to format text, so the "Format" menu can go. To do this, within the buildMenu method, we're going to call, builder.remove(menu: .format). Building and running again will show that the Format menu is no longer present. You'll notice in the screenshot above that there's also a "Services" sub-menu in the main application menu. This is unnecessary for Petty, so it's going to go as well. Removing it is the same as removing the Format menu, except we will specify .services instead. I'm also going to remove .toolbar-related menu items.
At this point, the buildMenu method is as follows:
override func buildMenu(with builder: UIMenuBuilder) {
    super.buildMenu(with: builder)

    builder.remove(menu: .services)
    builder.remove(menu: .format)
    builder.remove(menu: .toolbar)
}
Everything remaining in the menu at this point can stay there. The actions in the "View", "Window", and "Edit" menus are all taken care of by the system - at least for Petty.
There are a couple of actions that should be added to the menu bar. In the iOS version of Petty, it's possible to pull-to-refresh on the table view. This will reload the visible data. This action is also possible on macOS, and the Catalyst tools bring this feature across nicely. However, Mac users may expect other ways to refresh data. The Command-R keyboard shortcut is a common way to refresh data on the Mac, and it would be nice to use this shortcut to reload data in Petty on the Mac.
To add to the menu bar, either the .insertChild or .insertSibling methods can be called on the builder object. Calling insert child allows you to place a UIMenu object at either the start (top) or end (bottom) of a menu - for example atStartOfMenu: .file. Inserting a sibling allows for a more precise insertion either before (above) or after (below) another one. For example - afterMenu: .about means we want to insert a menu after the About menu. In this case of the reload data action, it should be put at the top of the file menu.
let refreshCommand = UIKeyCommand(input: "R", modifierFlags: [.command], action: #selector(reloadData))
refreshCommand.title = "Reload data"
let reloadDataMenu = UIMenu(title: "Reload data", image: nil, identifier: UIMenu.Identifier("reloadData"), options: .displayInline, children: [refreshCommand])
builder.insertChild(reloadDataMenu, atStartOfMenu: .file)
There's a bit happening in the code above. First, a UIKeyCommand is being created. Here is where a desirable keyboard shortcut - in this case Command-R - is specified for the action. The refresh command also needs a title, and this title is shown in the menu. We then initialise a UIMenu with the same title, can optionally provide it an image but ignore it in this case, and optionally give it an identifier. Options are also specified. In this case, .displayInLine is given as an option, which tells the system that this command belongs in the menu we're adding it to, and doesn't open yet another submenu. Then, we pass it an array containing one object - the refresh command which we created earlier. Finally, we insert the reloadDataMenu as a child on the builder object which we got from overriding the buildMenu method earlier, and specify that we want to insert it as an option at the start of the File menu. Note that when constructing the refreshCommand, a selector is specified. It's the code that will run when the menu item we just created is pressed, or the Command-R keyboard shortcut is used. If you want to specify a sender to that method, the type is simply AppDelegate.

Success! There's now a reload action in the menu bar.
This is what the buildMenu method should look like now:
override func buildMenu(with builder: UIMenuBuilder) {
    super.buildMenu(with: builder)

    builder.remove(menu: .services)
    builder.remove(menu: .format)
    builder.remove(menu: .toolbar)

    let refreshCommand = UIKeyCommand(input: "R", modifierFlags: [.command], action: #selector(reloadData))
    refreshCommand.title = "Reload data"
    let reloadDataMenu = UIMenu(title: "Reload data", image: nil, identifier: UIMenu.Identifier("reloadData"), options: .displayInline, children: [refreshCommand])
    builder.insertChild(reloadDataMenu, atStartOfMenu: .file)
}
The second action to add to the menu bar for Petty is a quick action to open the application settings. The iOS version of the app has its own settings screen, and it can be opened by tapping the settings icon on the main screen of the app. This is also the case when using the app on macOS - settings can be opened by tapping a button. However, Mac users are accustomed to open application preferences either via the application menu bar item, or via the keyboard shortcut Command-, (command-comma). It makes sense to support this in Petty, too.
The code is as follows, and is pretty similar to the reload data action:
let preferencesCommand = UIKeyCommand(input: ",", modifierFlags: [.command], action: #selector(openPreferences))
preferencesCommand.title = "Preferences..."
let openPreferences = UIMenu(title: "Preferences...", image: nil, identifier: UIMenu.Identifier("openPreferences"), options: .displayInline, children: [preferencesCommand])
builder.insertSibling(openPreferences, afterMenu: .about)
Note the input value is different. The keyboard shortcut is Command-, (command-comma), not Command-R, and that's specified in the UIKeyCommand object. This shortcut is also tied to a different action - openPreferences. The other difference is that we're inserting it by calling the insertSibling method on the builder object which allows us to specify that it belongs after the .about menu. The system knows what the About menu is. In this case it's the "About Petty" action in the main application menu. The system has also put this action it in its own section of the menu.
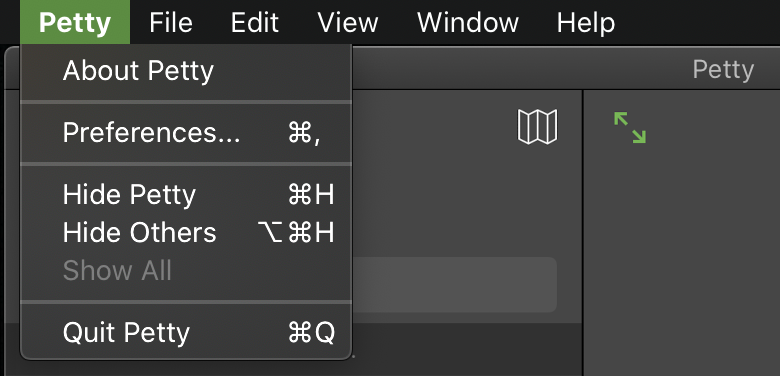
The preferences menu makes an appearance.
What has been achieved? We've programatically modified the menu bar actions in a Catalyst Mac app. This includes removing unneeded actions, and adding our own custom actions. The power of the menu bar is far greater than has been explored in this post, but it's a decent start, and satisfies the needs for menu bar customisation while building a macOS version of Petty. Of course, there are better ways to write and manage the code when a menu bar becomes more complex, or when the items in the menu bar differ from screen-to-screen in your app. Naturally, it is also not good practice to write too much code in the AppDelegate. That said, hopefully this post acts as a helpful guide for getting started when customising the menu bar for your own macOS apps that are being brought across from iOS using Catalyst.

The finished menu bar, after the customisation. It's what's on the inside of those menus that counts!
Below is the finished Swift code from this post. Note that in order for the following code to compile, you'll need to implement reloadData and openPreferences methods, and prefix them with @objc.
override func buildMenu(with builder: UIMenuBuilder) {
    super.buildMenu(with: builder)

    builder.remove(menu: .services)
    builder.remove(menu: .format)
    builder.remove(menu: .toolbar)

    let refreshCommand = UIKeyCommand(input: "R", modifierFlags: [.command], action: #selector(reloadData))
    refreshCommand.title = "Reload data"
    let reloadDataMenu = UIMenu(title: "Reload data", image: nil, identifier: UIMenu.Identifier("reloadData"), options: .displayInline, children: [refreshCommand])
    builder.insertChild(reloadDataMenu, atStartOfMenu: .file)


    let preferencesCommand = UIKeyCommand(input: ",", modifierFlags: [.command], action: #selector(openPreferences))
    preferencesCommand.title = "Preferences..."
    let openPreferences = UIMenu(title: "Preferences...", image: nil, identifier: UIMenu.Identifier("openPreferences"), options: .displayInline, children: [preferencesCommand])
    builder.insertSibling(openPreferences, afterMenu: .about)
}